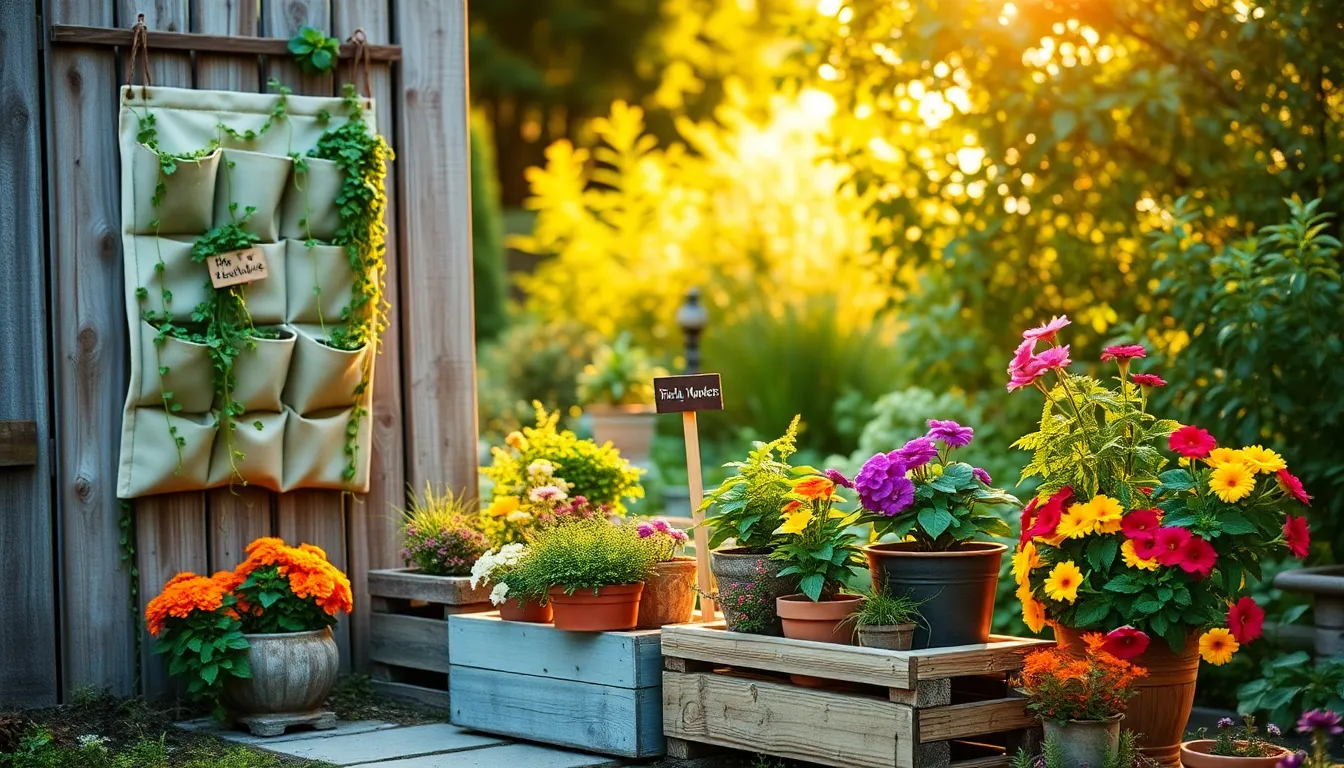

Gardening is a journey filled with creativity and joy, and whether you’re just starting out or have seasoned hands, there’s always room for more inspiration. “15 DIY Planter Ideas for Your Garden” is here to spark your imagination and elevate your green space with unique, personalized touches that reflect your style.
In this vibrant guide, you’ll discover planter projects that are as practical as they are charming, offering you the opportunity to transform everyday items into beautiful plant homes. These ideas promise not only to enhance your garden’s aesthetic but also to boost your confidence as you see your creations come to life, thriving and beautifying your surroundings.
By embracing these DIY planter ideas, you’ll not only save money but also gain the satisfaction of creating something uniquely yours. So, roll up your sleeves and dive into the rewarding world of gardening, where each planter you craft is a step toward a more delightful and personalized garden oasis.
Repurpose Old Tires as Planters
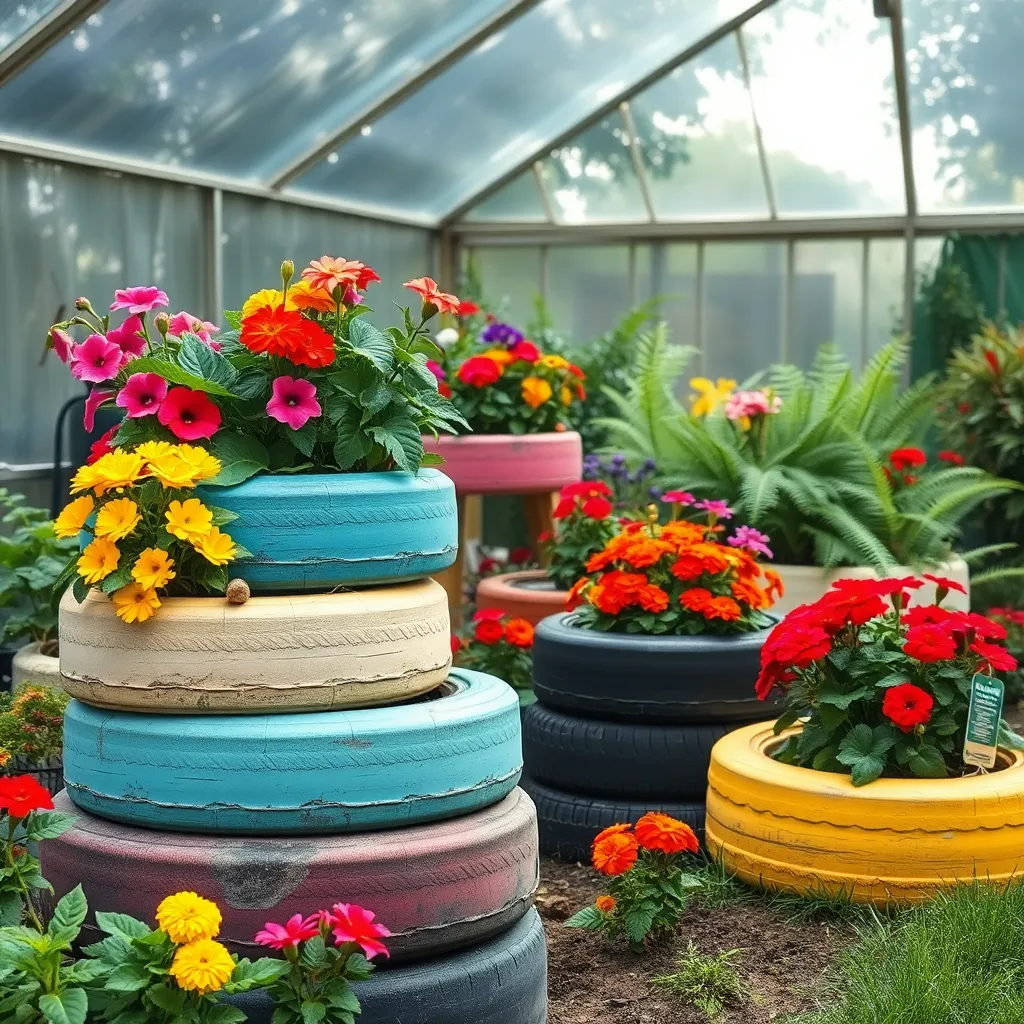
Repurposing old tires as planters is a fantastic way to recycle and add a rustic charm to your garden. To start, ensure that the tires are clean and free of debris, which can be done with a simple rinse and scrub.
When choosing plants for your tire planters, consider those that thrive in well-draining soil, such as succulents and herbs. Fill the tire with a mix of potting soil and compost to provide essential nutrients and improve drainage.
Place your tire planter in a spot that receives adequate sunlight, keeping in mind the specific light requirements of your chosen plants. For example, succulents require full sun, while some herbs like mint prefer partial shade.
Watering is crucial, so be sure to check the soil moisture regularly. Tires can heat up quickly, especially in sunny locations, so plants may need more frequent watering than those in traditional pots.
Transform Pallets into Vertical Gardens
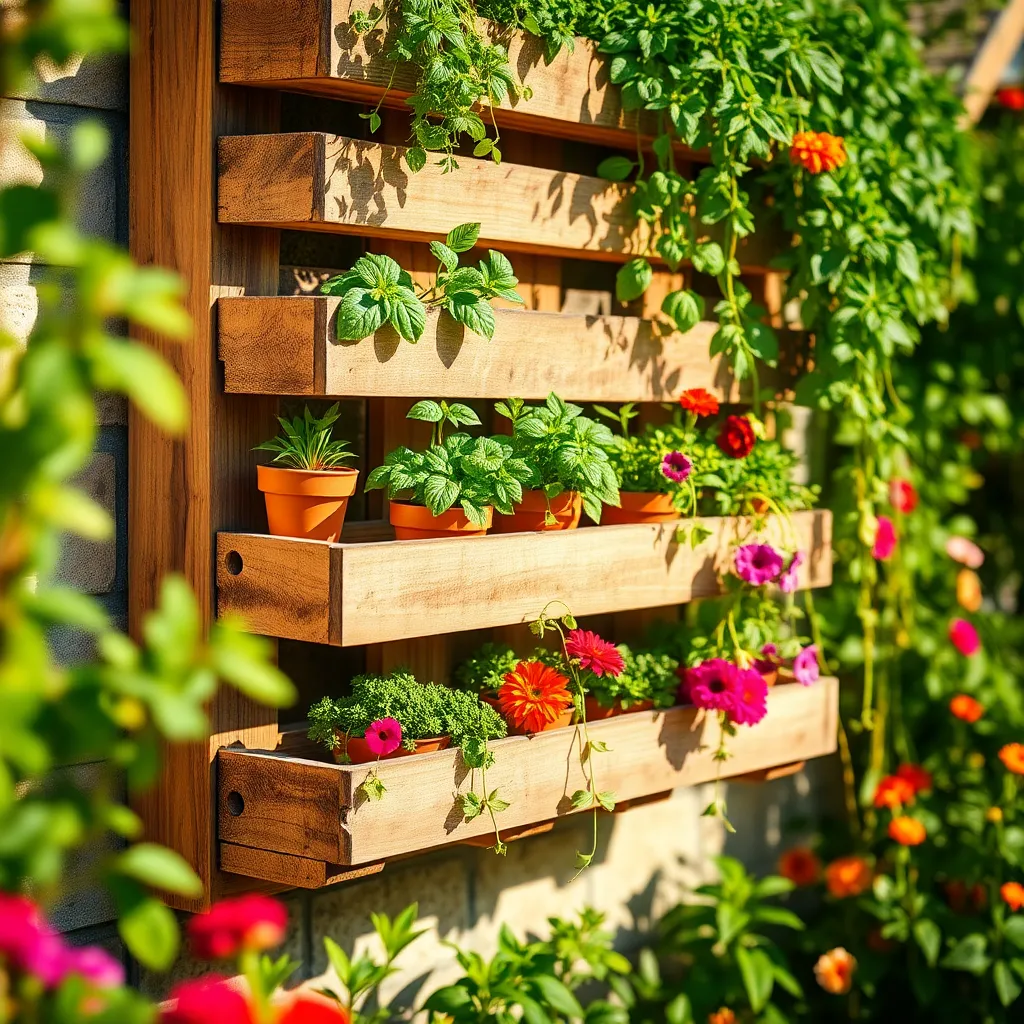
Transforming pallets into vertical gardens is a creative way to maximize your gardening space. Start by finding a sturdy, untreated wooden pallet, as this will ensure the safety of your plants.
To prepare your pallet for planting, line the back and sides with landscaping fabric or plastic sheeting. Secure it with a staple gun, making sure the material is taut to prevent soil from spilling out.
Choose plants that thrive in smaller spaces, such as herbs, succulents, or small flowering plants. Consider using a high-quality potting mix that retains moisture well, as vertical gardens can dry out faster than traditional beds.
Water your vertical garden regularly, ensuring that the top plants receive enough moisture while excess water drains to nourish the lower sections. For best results, use a drip irrigation system or a soaker hose to maintain consistent soil moisture levels.
Utilize Wooden Crates for Herbs
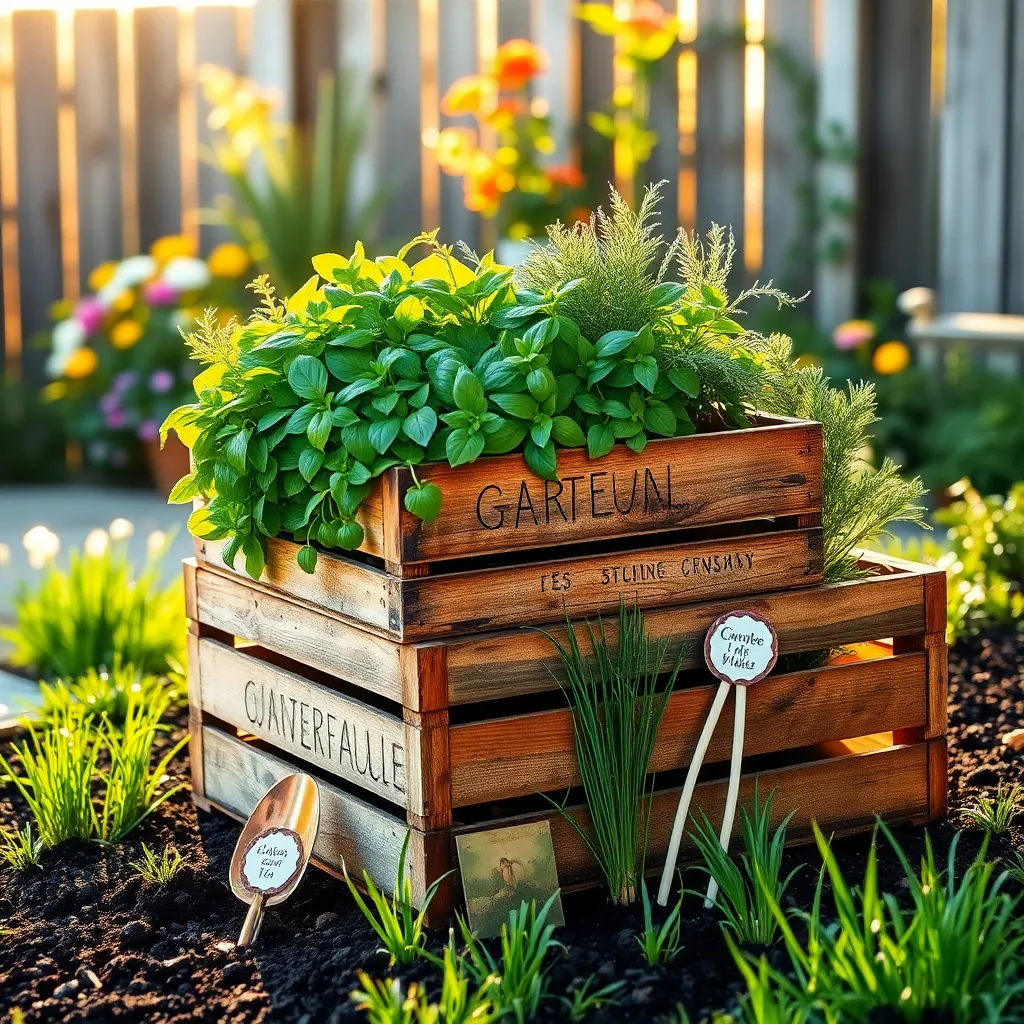
Repurposing wooden crates for herb gardening is a stylish and sustainable option. These crates offer excellent drainage and can be easily moved to ensure your herbs get the right amount of sunlight.
To get started, line the bottom of the crate with landscape fabric or burlap to prevent soil from falling through. Fill the crate with a quality potting mix that is rich in organic matter to provide your herbs with the nutrients they need.
Herbs like basil, thyme, and parsley thrive in these setups, given their need for well-draining soil. Water your herbs regularly, ensuring the soil remains moist but not waterlogged, and place the crate in a sunny spot for optimal growth.
For those with more gardening experience, try mixing herbs with different nutrient needs in one crate to create a diverse herb garden. Consider rotating the crates every few weeks to ensure even sunlight exposure, fostering uniform growth among all herbs.
Convert Tin Cans into Flower Pots
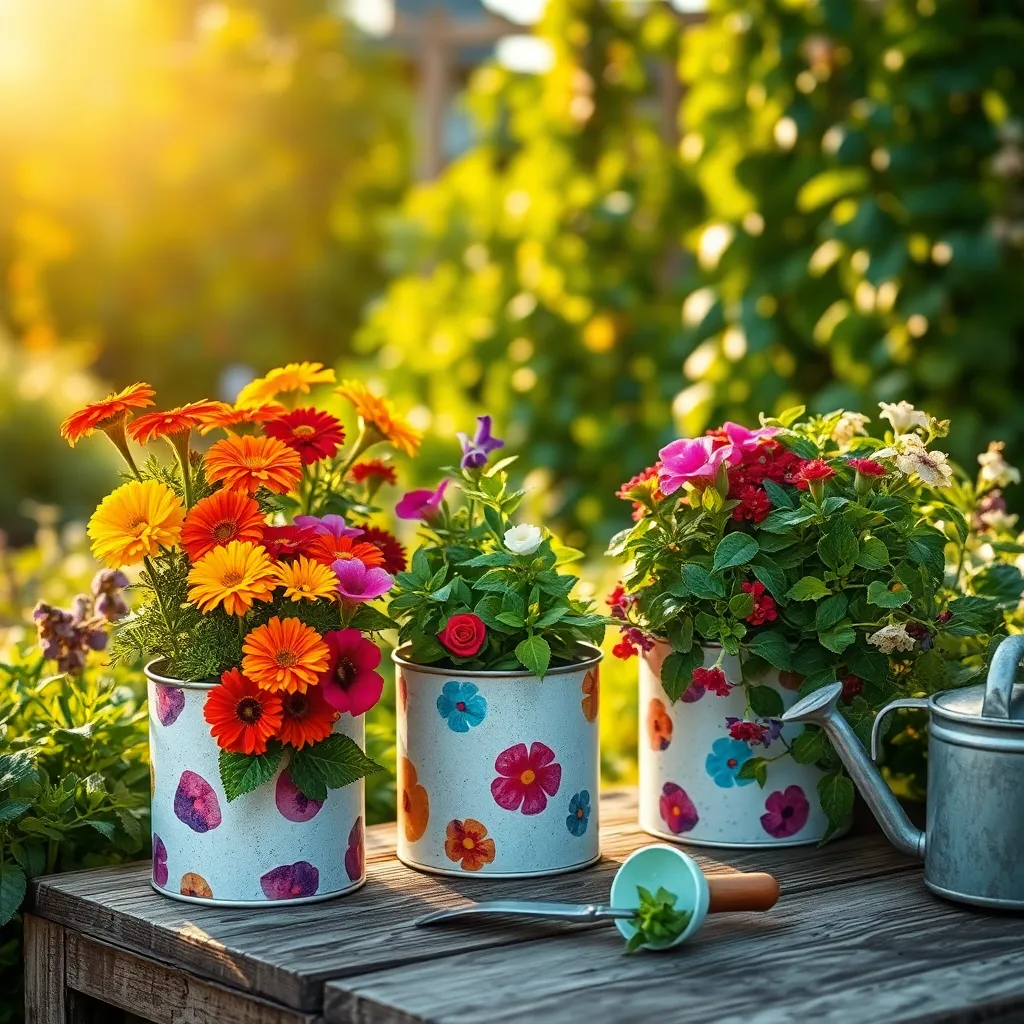
Transforming tin cans into flower pots is a simple and sustainable way to add character to your garden. Begin by thoroughly cleaning the cans and removing any labels to prevent mold growth.
Before planting, drill a few small holes in the bottom of each can for drainage, which is essential to prevent root rot. Line the bottom with a layer of pebbles or small stones to further enhance drainage.
Select a high-quality potting mix to fill your tin cans, ensuring it provides adequate nutrients and aeration. For most flowering plants, a mix containing perlite or vermiculite is beneficial to maintain moisture without waterlogging.
Consider growing small, colorful flowers like petunias or marigolds, which thrive in sunny locations and require watering every other day. For more advanced gardeners, try experimenting with succulents, which are drought-tolerant and need less frequent watering, making them perfect for tin can planters.
Craft Concrete Planters for Succulents
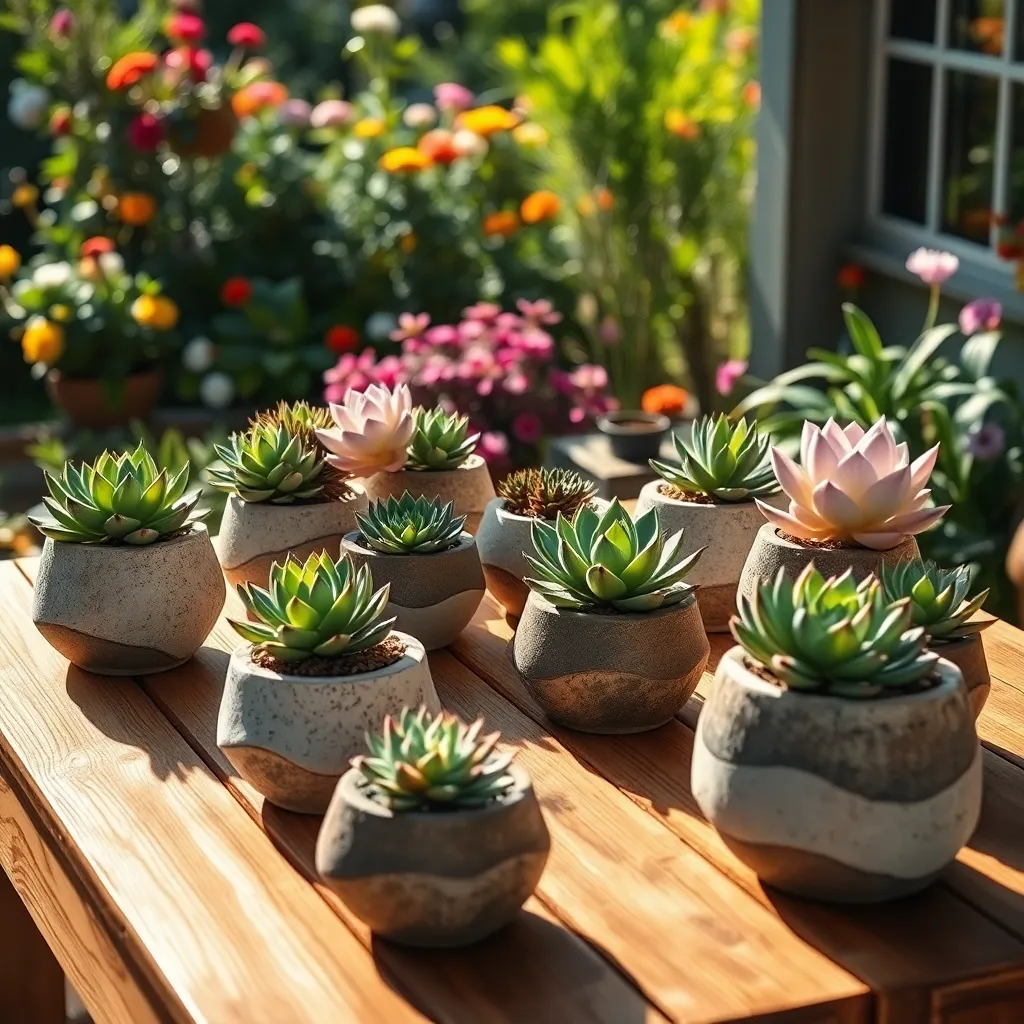
Creating concrete planters for succulents is a rewarding DIY project that adds a modern touch to your garden. Start by gathering your materials: you’ll need concrete mix, water, a container for mixing, and molds to shape your planters.
For beginners, using plastic or silicone molds can simplify the process, as they make it easy to pop out the cured concrete. Mix the concrete according to the package instructions, ensuring a smooth consistency that’s easy to pour into your chosen molds.
Once poured, tap the molds gently to release any air bubbles, which ensures a solid, stable planter for your succulents. Allow the concrete to cure for at least 24 to 48 hours, depending on humidity and temperature.
After curing, unmold your planters and drill small drainage holes at the bottom, which is crucial for succulent health. Fill your planters with a well-draining soil mix, such as one part potting soil, one part sand, and one part perlite, to prevent root rot.
Place succulents in your new planters, ensuring they receive plenty of indirect sunlight, which is optimal for their growth. Water sparingly, allowing the soil to dry completely between waterings to mimic their natural arid environments.
Use Mason Jars for Indoor Herbs

Mason jars are a charming and practical way to grow indoor herbs, offering a clear view of root development. Begin by choosing herbs such as basil, mint, or cilantro, which thrive indoors and require minimal space.
To ensure proper drainage, add a layer of small pebbles at the bottom of each jar. Fill the jar with a light, well-draining potting mix, ideally a mix containing perlite or vermiculite to prevent waterlogging.
Place your mason jars in a location that receives ample sunlight, like a south-facing windowsill. Herbs generally need about 6 to 8 hours of sunlight daily, so consider supplementing with a grow light if natural light is insufficient.
Water your herbs sparingly to avoid root rot, allowing the top inch of soil to dry out between waterings. For additional care, rotate the jars every few days to promote even growth and prevent the plants from leaning toward the light.
Build Raised Beds with Reclaimed Wood
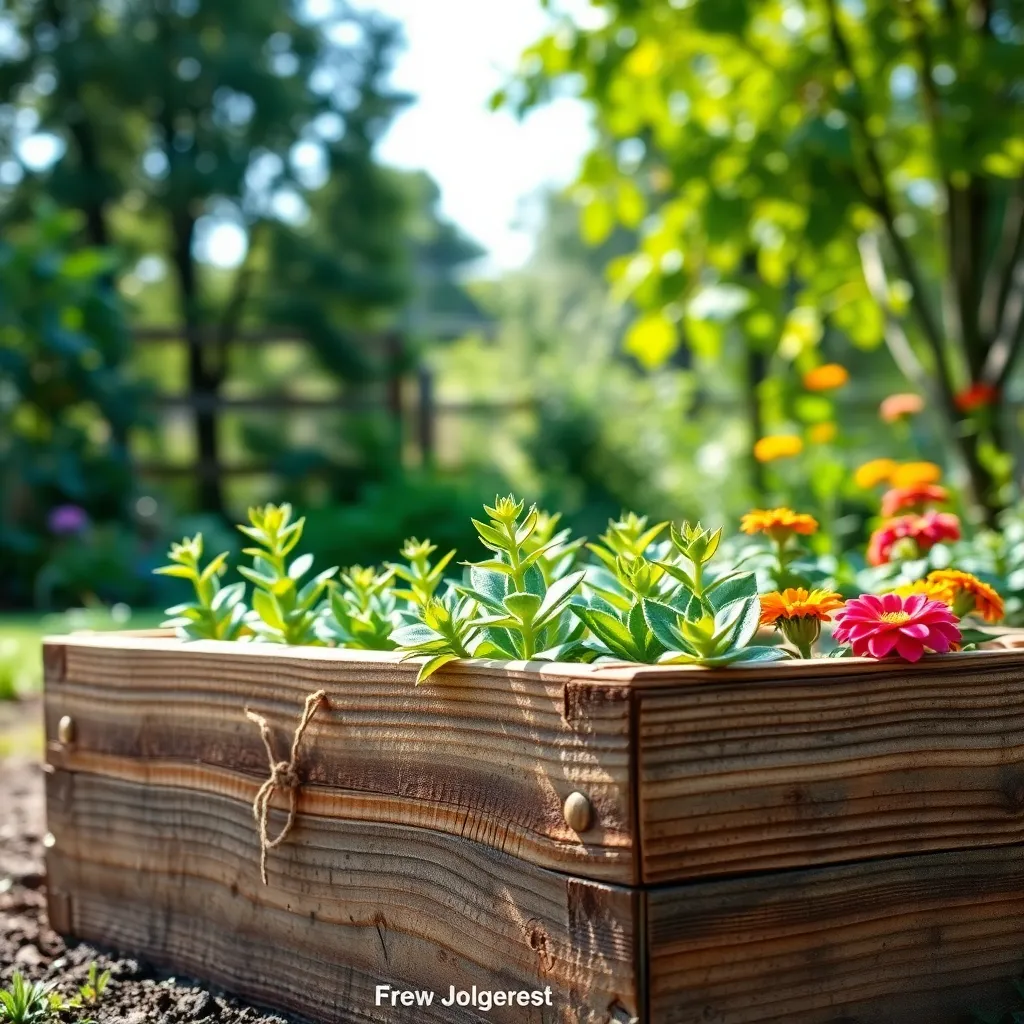
Creating raised beds with reclaimed wood is an excellent way to add functionality and sustainability to your garden. Start by sourcing untreated wood, such as old pallets or barn wood, ensuring it is free from chemicals and rot.
Begin by deciding on the size and location of your raised bed, considering the sunlight and drainage in the area. For stability, construct the bed to be no wider than four feet, allowing easy access to the plants from either side.
Once you have your wood and location, cut the wood to the desired lengths and assemble the frame using screws or nails. Line the bottom with landscape fabric to prevent weeds while allowing water to drain efficiently.
Fill your raised bed with a mix of compost, topsoil, and peat moss for a nutrient-rich growing medium. Water the soil thoroughly before planting to ensure it is evenly moist and ready for your plants.
Create Hanging Planters from Bottles
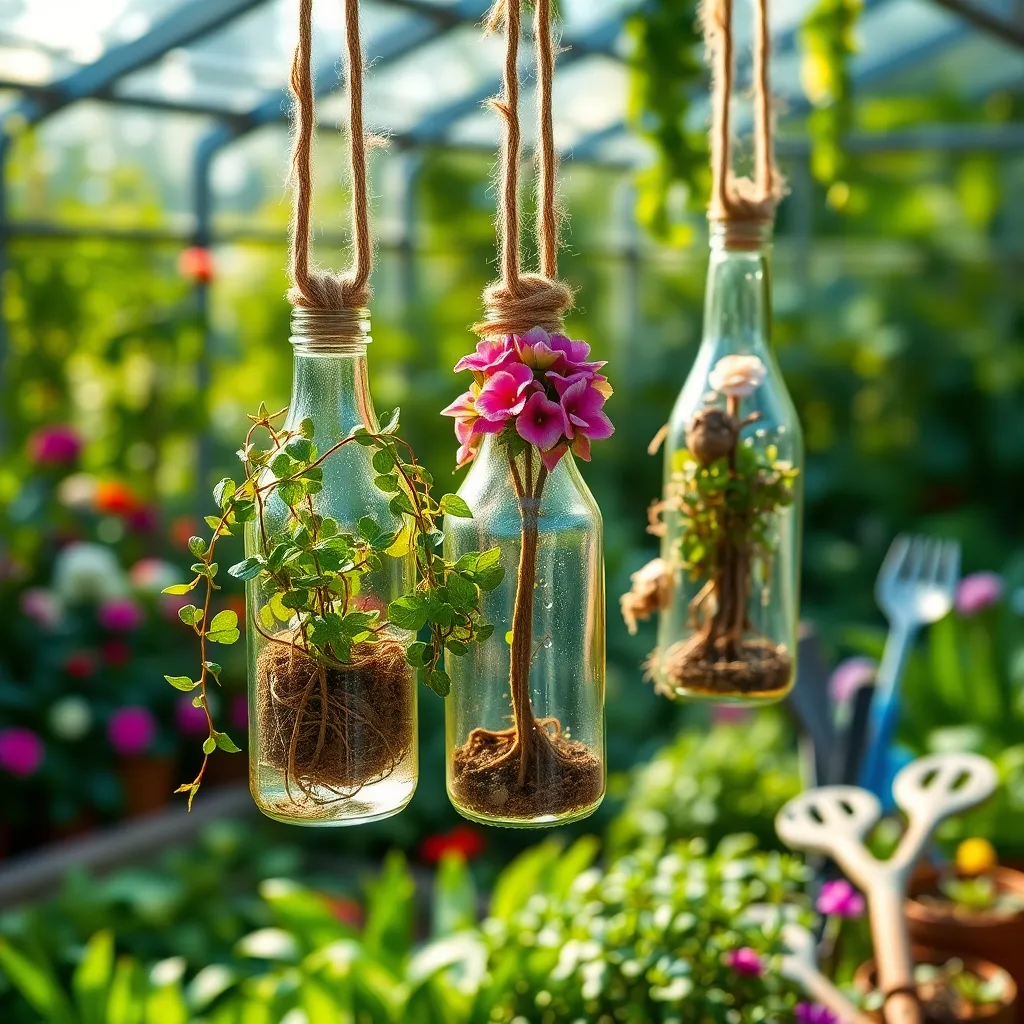
Transforming discarded bottles into hanging planters is an eco-friendly way to add greenery to your garden. Begin by thoroughly cleaning the bottles and removing any labels to ensure a neat appearance.
Once cleaned, cut the bottles in half and use the bottom portion as your planter. Drill small drainage holes in the bottom to prevent waterlogging and promote healthy root growth.
Choose lightweight plants such as herbs, succulents, or small flowering varieties that thrive in limited soil. Use a well-draining potting mix, ideally one containing perlite or sand, to ensure good aeration.
Securely hang the planter using sturdy cord or wire, ensuring it is well-balanced to prevent tipping. Position your planters in an area that receives adequate sunlight, typically 4 to 6 hours daily, depending on the plant’s needs.
Water your hanging planters regularly, but take care not to overwater, as this can lead to root rot. For an added touch, consider painting or decorating the bottles to enhance their visual appeal in your garden space.
Design Tiered Planters with Terracotta
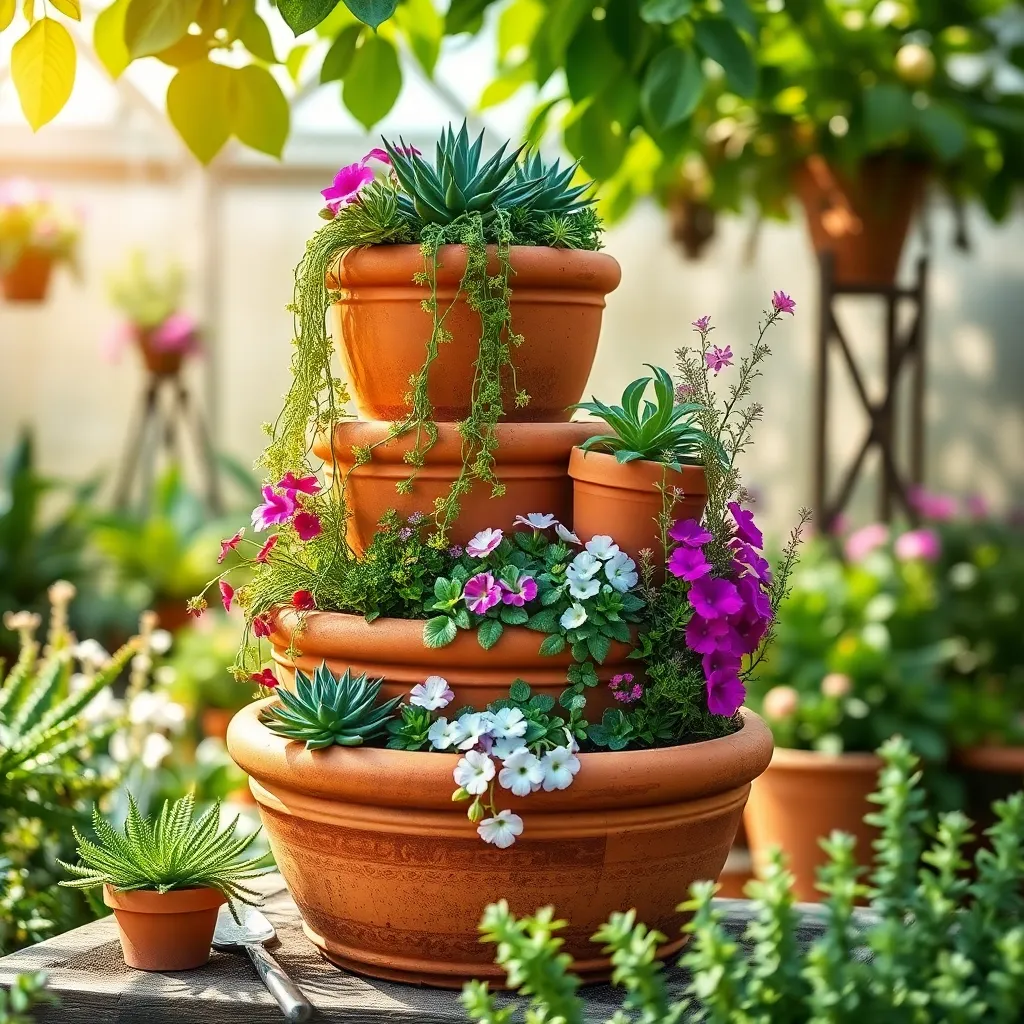
Designing tiered planters with terracotta pots is a creative way to maximize your garden space. Start by selecting pots in various sizes to create a visually appealing cascade.
Begin with a large pot as your base, filling it with a well-draining soil mix rich in organic matter. Stack a slightly smaller pot on top, ensuring each pot has adequate drainage holes to prevent waterlogging.
Choose plants that thrive in similar conditions to ensure harmonious growth. Consider using herbs like basil, thyme, and rosemary, which flourish in well-drained soil and full sun.
Water your tiered planter sparingly, allowing the top inch of soil to dry out between waterings. This approach will help prevent root rot and encourage healthy growth in terracotta pots.
For an advanced touch, incorporate a slow-release fertilizer into the soil mix to provide nutrients over time. This will support robust plant development without the need for frequent feedings.
Fashion Planters from Vintage Teacups
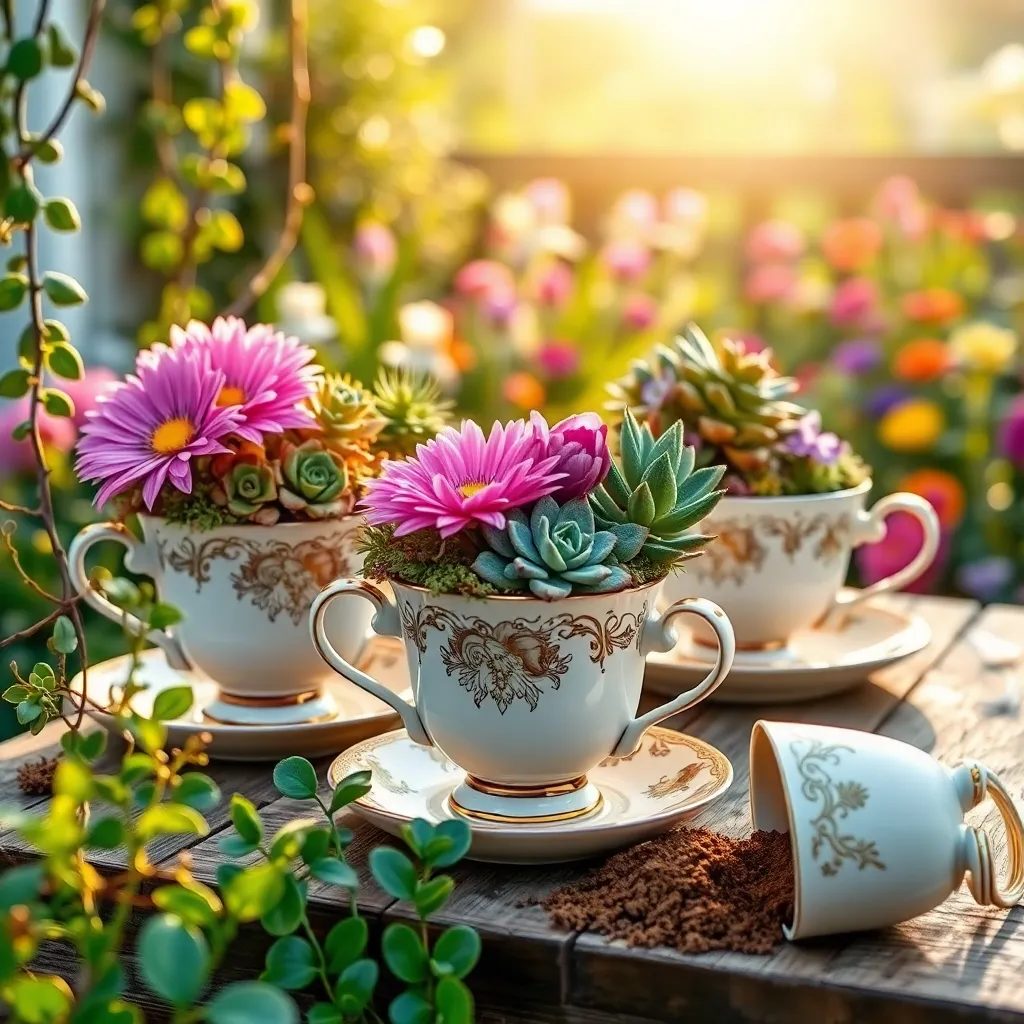
Transforming vintage teacups into planters brings a touch of elegance and whimsy to your garden. Start by selecting teacups with drainage holes or drill small holes yourself to prevent waterlogging.
Choosing the right plants is essential for these fashion planters. Opt for small, shallow-rooted plants like succulents or herbs, as they thrive in confined spaces and require minimal soil depth.
Use a well-draining potting mix to ensure your plants remain healthy. A blend of cactus soil and perlite is ideal for succulents, while a standard potting mix works well for herbs.
Watering these small planters requires special attention. Monitor the moisture level by feeling the soil; water only when the top inch feels dry, as overwatering can lead to root rot.
To add an advanced touch, group several teacup planters together for an eye-catching display. This not only maximizes visual impact but also creates a microenvironment that can benefit your plants.
Upcycle Wine Barrels for Large Plants
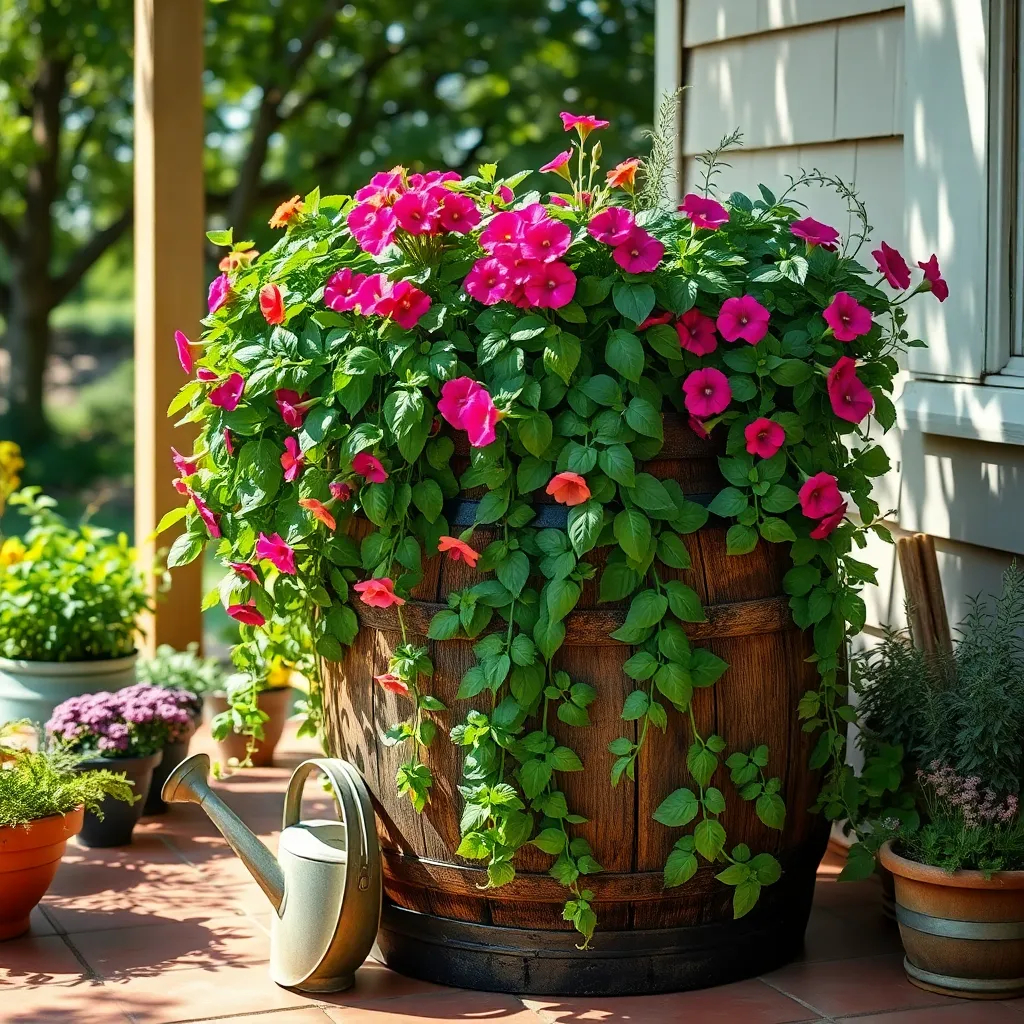
Transforming used wine barrels into planters is a fantastic way to create large, sturdy containers for your garden. These barrels are perfect for deep-rooted plants and can add a rustic charm to your outdoor space.
Begin by ensuring proper drainage by drilling several holes in the bottom of the barrel. This will prevent waterlogging and help maintain the health of your plants.
Fill the barrel with a well-draining potting mix, such as a combination of garden soil, compost, and perlite. This mixture will provide the necessary nutrients and aeration for your plants to thrive.
Wine barrel planters are ideal for growing large plants like dwarf fruit trees, tomatoes, or even small shrubs. Water these plants regularly, ensuring the soil remains moist but not soggy, to support their growth.
Make Shoe Organizer Pocket Gardens
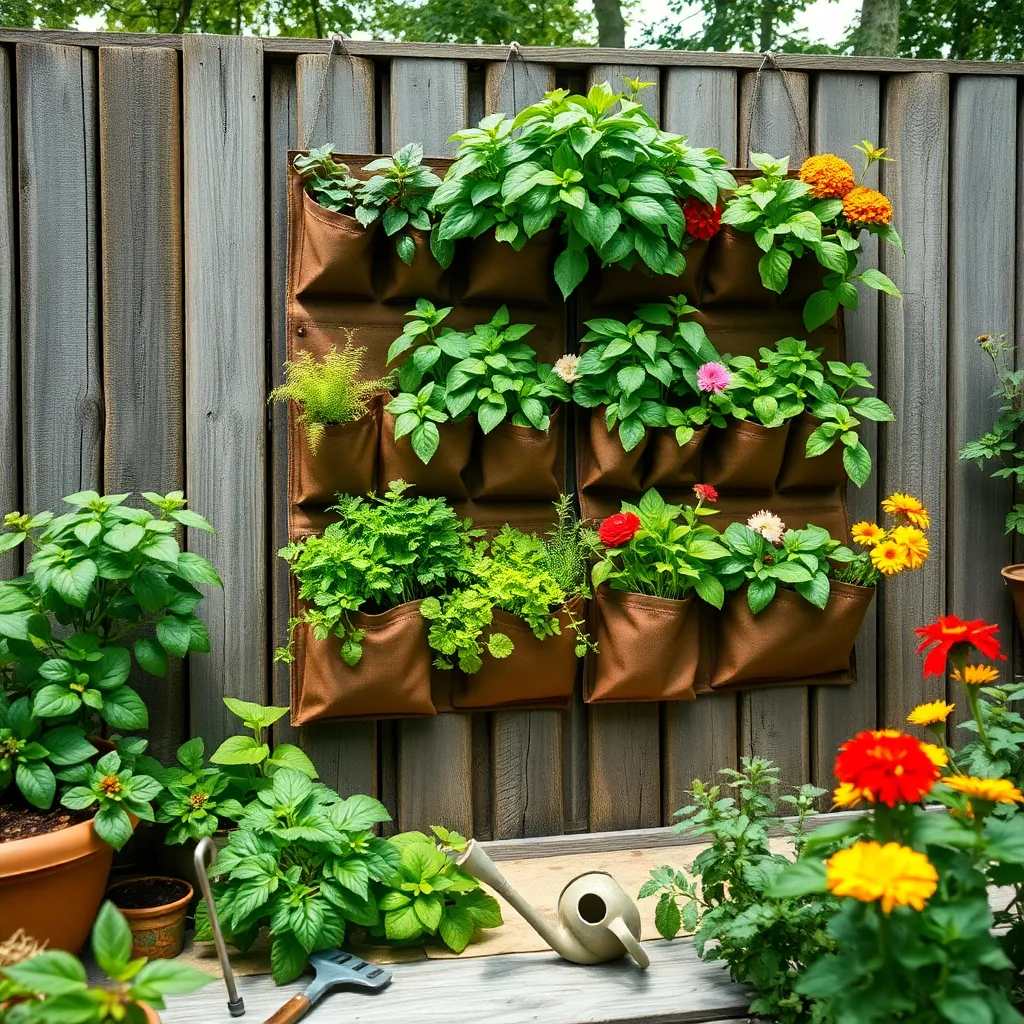
Shoe organizer pocket gardens offer a unique and space-saving way to grow plants vertically. This method is perfect for those with limited garden space, as it allows you to make the most of a sunny wall or fence.
Start by selecting a sturdy shoe organizer made of breathable material like cloth or canvas, which helps with drainage. Secure the organizer to a wall or fence using heavy-duty hooks or screws, ensuring it can support the weight of soil and plants.
Fill each pocket with a lightweight potting mix that retains moisture but drains well, such as one containing perlite or vermiculite. Consider adding a slow-release fertilizer to support plant growth over time, especially if you’re growing vegetables or flowering plants.
Choose plants that thrive in the conditions where your organizer is placed, such as herbs, small flowers, or lettuce varieties. Make sure to water regularly, as the pockets can dry out faster than traditional pots, especially in direct sunlight.
Assemble Cinder Block Plant Stands
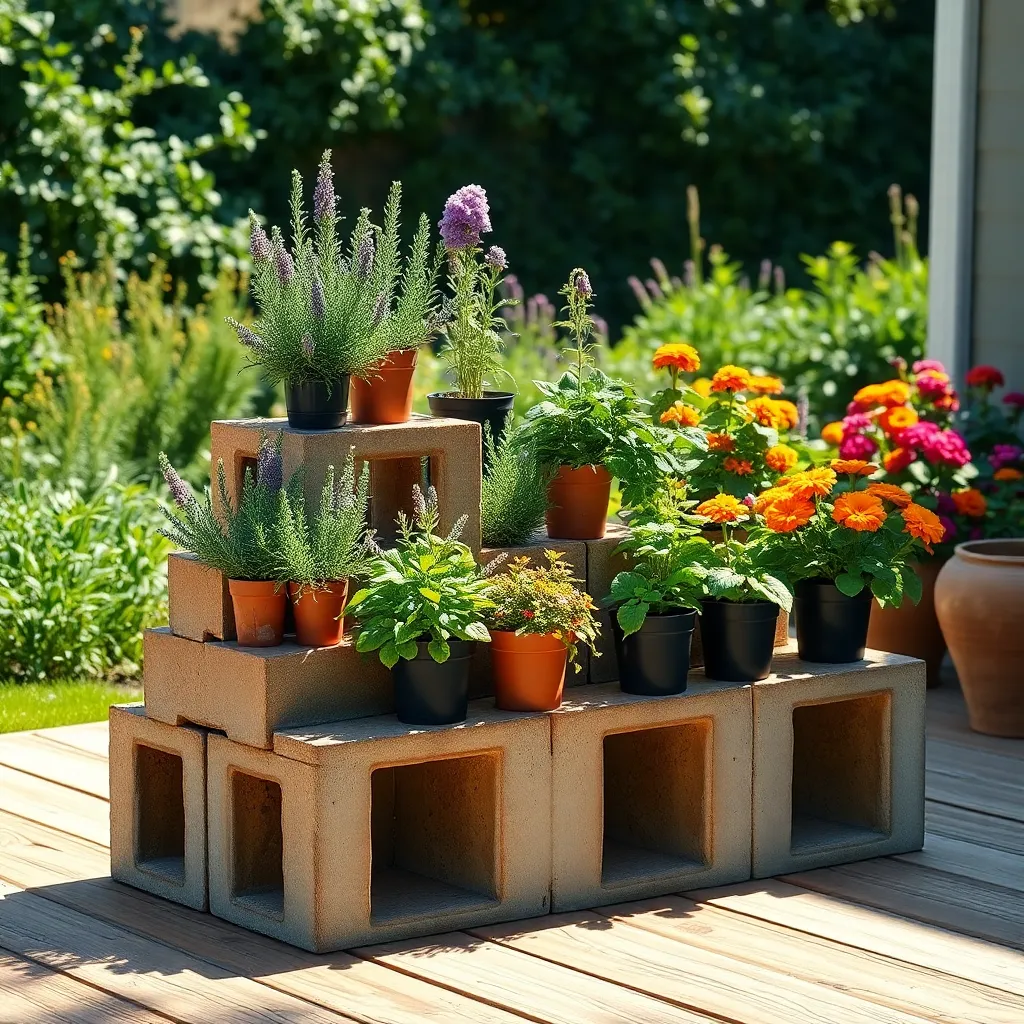
Cinder block plant stands offer a simple yet stylish way to elevate your garden pots. These stands are incredibly easy to assemble and can be adapted to fit any garden space.
To begin, gather a few cinder blocks and place them in your desired location. Ensure the ground is level and stable to support the weight of the blocks and pots.
Stack the cinder blocks in a configuration that provides adequate support for your planters. For a basic setup, two blocks side by side can support a third block laid across them horizontally.
Consider painting the blocks for an added touch of color that complements your garden’s aesthetic. Use weatherproof paint to ensure durability against the elements.
When selecting plants for your elevated stands, choose those that benefit from better drainage, such as succulents or herbs. The height of the stands can also protect plants from ground pests and improve sunlight exposure.
Decorate with Painted Salvaged Drawers
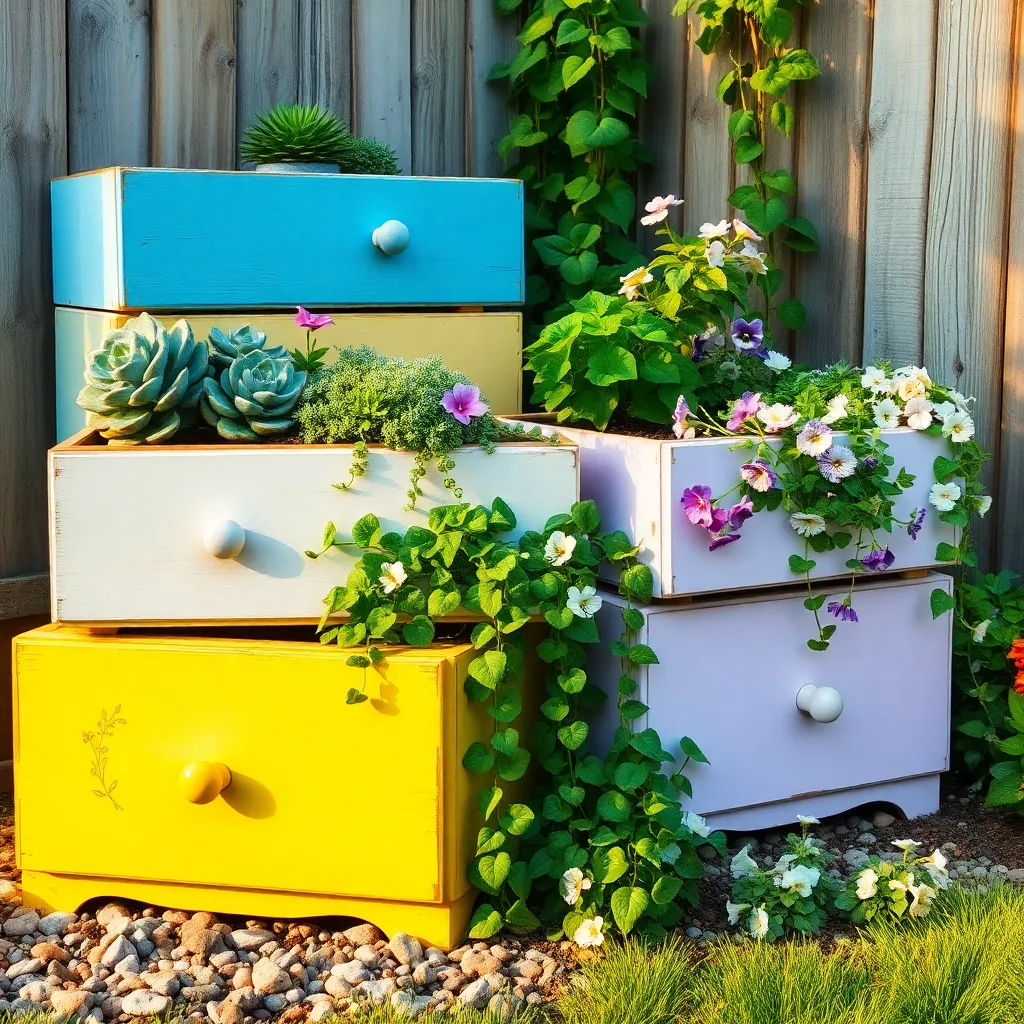
Transforming salvaged drawers into colorful planters is a creative way to add charm to your garden. Begin by selecting drawers that are structurally sound, and give them a fresh coat of exterior-grade paint to withstand the elements.
Once painted, line the bottom of each drawer with landscape fabric to ensure proper drainage. Fill the drawers with a blend of potting soil and compost, creating a nutrient-rich environment for your plants to thrive.
Choose plants that suit the depth and sunlight exposure of your drawers. For shallow drawers, consider growing succulents or herbs, which require less soil depth and are relatively drought-tolerant.
Water your drawer planters thoroughly, allowing excess water to drain out, and adjust watering frequency based on the plant types and weather conditions. To add a touch of sophistication, consider arranging drawers at varying heights using bricks or wooden blocks, creating a tiered garden effect.
Construct Planters from Old Gutters

Old gutters can be transformed into practical and attractive planters with just a little effort. Start by cutting the gutters into manageable sections, typically around 3 to 4 feet long, to make them easy to handle and hang.
Before planting, drill drainage holes at regular intervals along the bottom of each gutter section. This will ensure that excess water can escape, preventing root rot and keeping your plants healthy.
For best results, fill your gutter planters with a well-draining potting mix. Consider adding a bit of perlite or coarse sand to improve soil aeration, especially if you’re planting succulents or herbs.
Gutter planters are perfect for growing shallow-rooted plants such as lettuce, strawberries, or even small flowering annuals. These plants require regular watering, so make sure to check the soil moisture daily, especially in warmer climates.
To add an advanced touch, install a simple drip irrigation system to your gutter planters. This setup will automate watering, ensuring consistent moisture levels and freeing up your time for other gardening tasks.
Conclusion: Growing Success with These Plants
As you venture into the world of DIY planters, remember that each creative endeavor echoes essential relationship concepts: nurturing growth, embracing diversity, and investing time and effort. From repurposing old items to crafting unique designs, these planter ideas teach us about resourcefulness, patience, and the beauty of personalization in our relationships. Whether you’re transforming a vintage suitcase or crafting a hanging garden, each project is a metaphor for cultivating and sustaining love and connection.
To bring these insights to life, choose one DIY planter project to start today. This hands-on activity will not only enhance your garden but also serve as a reflection of your dedication to nurturing relationships.
I invite you to save this article now as a reminder of the valuable lessons each planter holds. Bookmarking it ensures you have a ready reference to revisit these creative inspirations and relationship insights anytime.
Looking ahead, let these planter projects be a testament to your commitment to growth, creativity, and connection. With each completed project, you not only beautify your surroundings but also fortify the foundation of loving, resilient relationships.